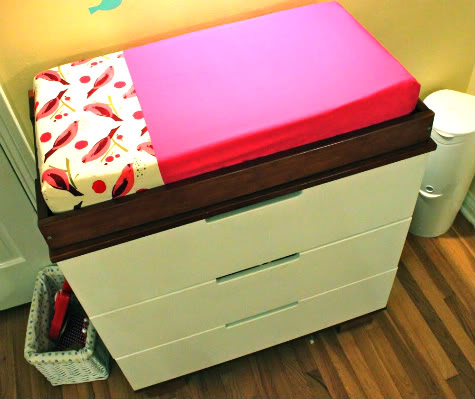
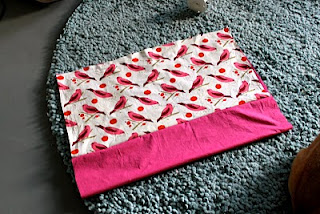
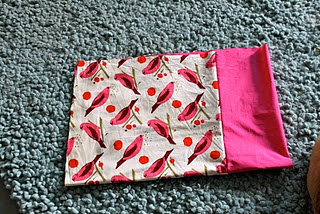
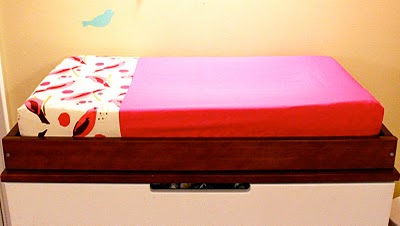
So changing pad covers get filthy, that doesn’t mean they can’t be cute. Just put the adorable fabric up where the baby’s head goes.
The great thing about this changing pad cover how-to is there is no top stitching, so if you aren’t great at sewing, no one will see your crooked stitches. It’s simple, I promise. Get the full tutorial after the jump.
And thanks for the post OhDeeDoh!
How To Sew a Changing Pad Cover
This changing pad cover fits a standard changing pad (32″L X 16″W X 3-4″H)
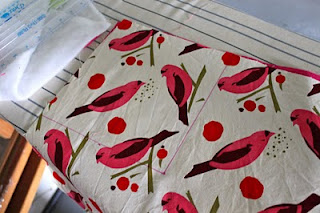
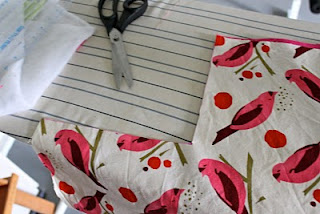
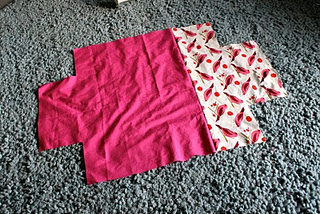
1. Wash, iron and cut your fabric. I used a pink cotton (though you might prefer a minkee or fleece) and Alexander Henry Bird Seed in pink (get it here).
My cover uses two different fabrics, but if you want to make a changing pad cover out of all one fabric, then just cut one piece 48″X32″.
If you want to use two fabrics like me, you’ll need two pieces:
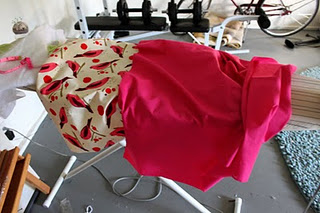
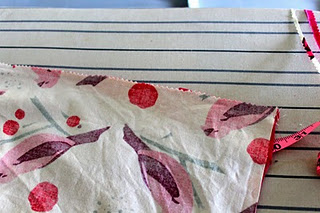
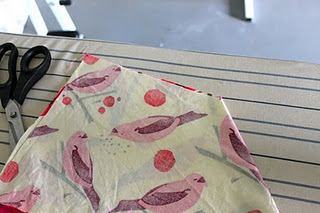
2. Lay your fabrics together along the 32″ sides with right sides facing and sew, then trim your seam with pinking shears:
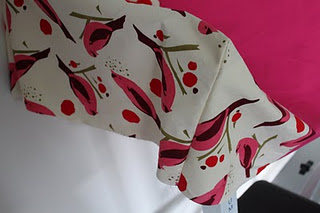
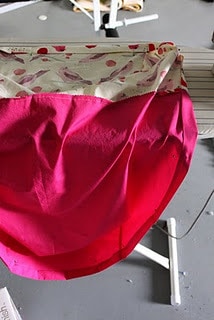
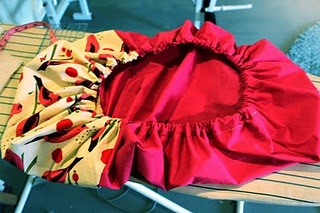
and sew them together. repeat on all four corners. when you’re done your changing pad cover will look something like this:
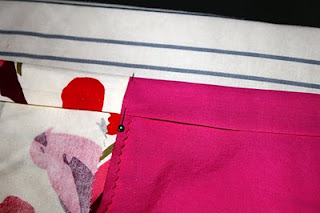
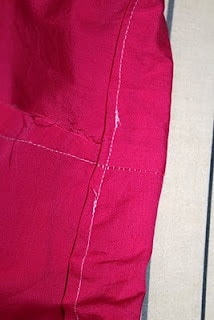
5. Now on the inside edge that’s raw, fold it over 1/2″ or so and iron, all the way around. Then fold it another inch, iron and pin in place. You are creating a tube for your elastic. Try to iron and pin the seam between the two fabrics open:
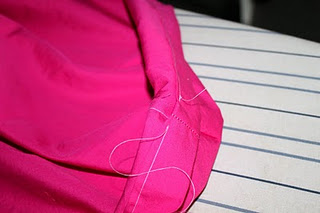
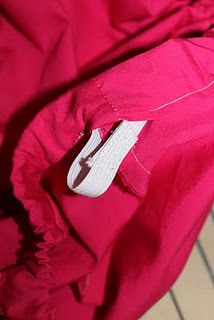
6. Starting next to a corner, sew it in place at the edge of the seam, leaving a hole at the corner to feed your elastic through, backstitching at beginning and end:
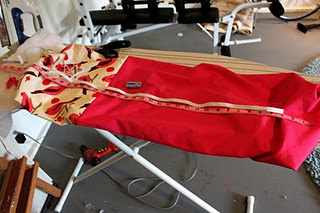
Attach a safety pin to one side and attach the other side to the changing pad cover with a pin and feed the elastic through the tube:
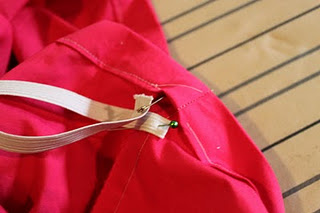
When you pull it out, sew the two sides together with a stretch stitch or with a straight stitch shaped like a box with an X in the middle:
This is gorgeous! I recieved the same bird fabric in teal and orange as a Christmas gift from my Mother-in-law.
Can anyone help me understand the part where says to sew corners . some reason its not coming to me
You’re making the side pieces by putting the two corners of what’s left of the now removed square (right sides together) and stitching what will be a corner of the cover. When turned right side out, you will have one of the corners that will go around the side of the pad. This is repeated on all four corners (stitching with right sides together). Imagine doing hospital corners on a bed sheet. It will be like stitching down the triangle in the corner so you have a nice close fit on all four ends.
Hope this helps 🙂
Can anyone help me understand the part where says to sew corners . some reason its not coming to me and the rest of four corners>
pretty sides matching and pin sew them together makes corners
Feeling like an idiot right about now. The tut seems to work fine for everyone else, but I ruined it after I cut out my 8″ squares. Not enough fabric now to cover my pad. Very strange. Something went awry and I’ve ruined my fabric. 🙁 Bummer.
PS. You are totally picking up the slack for me with all of these amazing new DIYs. You are the best blog partner ever.
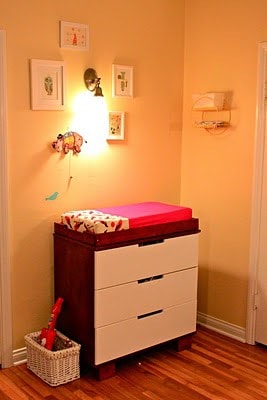
love the changing pad cover and the dresser it sits on, is it from ikea? Anyway, I'm going to be a follower now, you have such cute stuff. Too bad I'm pretty much done on the changing table phase, but it doesn't stop me from making baby gifts!! 🙂
thanks anna! the dresser/changing table is from Walmart!
Fabulous cover! I love it when simple projects yield such stylish results!
I want to make one for Joleen's nursery! So adorbale!
Perfect! Off to make one now.
I just bought a changing pad at Target the other day and was thinking about the best way to cover the ugly white plastic. Thanks so much for this easy and beautiful tutorial!
nikki! i want to see a picture!!
Does anyone know if this pattern needs to be modified for a contoured changing pad? Thanks! Looks great!
I just made this last night and your tutorial was so great and easy to follow! Thanks so much! It turned out really cute!
I'd also like to know if this pattern needs to be modified for a contoured change pad. Anyone?
hey there! the changing pad in this tutorial actually is contoured! so no, doesn't need to be modified, unless yours is especially thick, then you'd just need to add however many inches thicket it is all the way around, and the same number of inches to the squares you cut out at the corners. hope that answers your question!
I had to mess with the elastic on the first one I made and after adding more elastic (twice) I was happy with the way they fit with 52 inches of elastic. The corners of the changing pad caved in because the elastic was so tight. I ended up making three and love them! I did minky with flannel accent, flannel with cotton accent, and flannel with flannel accent. Thanks for the great pattern!
I finally got around to posting a picture and linking your tutorial. Thanks so much for all your great ideas and tutorials! There are so many more that I plan on using, especially with the huge project of decorating our new nursery!
Thanks!
Socktopus Creations
I totally want to make some of these, but first, a quick question: when you sew the two fabrics together, how big is the seam allowance you used before trimming with the pinking shears?
hi colleen! just 1/4"
Thanks so much for this great tutorial! I featured it on my blog, miymdiary.blogspot.com this week because it's soooo incredibly brilliant. thanks again!
hi, I want to share this with a sewing friend of mine to make me a changing pad cover. Forgive my ignorance, but my changing pad is 17X33. What size fabric should I buy if I want one entire piece of fabric for the cover?
ss-one piece 49"x33" will do it!
yaaaaay, i just got a changing pad finally. baby macy was always in some other place then her own room to play and sleep. no longer. except right now while she drifts off on my lap. back to the point ive been wanting to make one of these. i just made the snappy toddler shirt for my 7 month old. shes very tall so it turned out great,
Just made two of these. Thanks for the fabulous tutorial! Room is almost complete. Yay!
I did't even own a sewing machine but I just HAD to try this!
Worked out beautifully. Thanks so much!
I just made a cover up for my neighbor and have some fabric left over. I'm going to give at a shot. I've never done anything with elastic, so wish me luck. Her babies room is zebra and pink.
Tiphanie
Thanks for posting this! Your tutorial was easy to follow and the cover came out perfect for my changing pad. I used a large piece of fleece that I had left over from making nursing pads. I'm going to get some more fleece and make a second one. I used a 1/4" elastic because that's what I had on hand but I wish I bought something wider because the ends were so hard to sew together!
Thanks so much for the tutorial. I used some leftover flanelette for the main part and cut up a towel for the top. I will have to make a 2nd one for when this one is in the laundry!
Do you do anything to allow the safety strap to come through? My changing pad has a safety strap to keep the baby safe.
on our changing pad the straps wrap around from underneath, but if you wanted to add a hole, i recommend doing a buttonhole!
I just made one with a brown minky fabric and it only took 20 minutes during nap time! Thanks for the pattern, even a little accomplishment makes me feel like i've conquered the world with a 6 week old to take care of.
Love this Idea! Making one on tuesday 🙂
Thank you so much for this tutorial. I used it to make one for my new baby and blogged about it (and linked back to your site) http://daniellebartran.blogspot.com/2011/02/baby-projects-changing-pad-cover.html
Nevermind my previous comment- I figured it out once I got to that step while making it. 🙂
Love this! Exactly what I was looking for! Thanks so much for all the wonderful ideas on this blog – I use it all the time!
This is perfect! I have a friend who wants me to make a changing table cover but I have never made one and wasn't sure how to do it. It's the same as making a crib sheet, just smaller. Thank you
It worked! I just finished mine. Thanks so much for sharing the tutorial. I can't wait to make another one for backup.
[…] the tutorial that I used from Prudent Baby. It was pretty easy to follow, so I recommend it. Now that I’ve done one, I could easily […]
[…] Pad Pattern To Go Changing Pad Pattern Diaper Stacker Pattern Burp Cloth Pattern [I've made burp cloths, but you gotta check out what […]
[…] I’ll be using this tutorial to make my own changing pad cover using a canary yellow minkee fabric with the teal elephant fabric […]
I haven’t uploaded my pics yet, but I just made an orange minky dot pad cover, and it turned out beautifully…. I have VERy little sewing experience, your tutorial was great! Thanks so much for sharing! 🙂
Great, easy tutorial!! Only thing was my changing pad cover is a different size and I tried to alter the dimensions but it didn’t fit…. Could I please get the size of material needed for a 33″ L x 22″ W x 4″ H? Would really help thanks. 🙂
[…] followed the curves of the change pad, but I did take inspiration for the two-coloured look from here. I made three sets, and love […]
Hilary Rogers February 20th, 2012You used to have your original stab at a changing pad cover posted, and that’s the one I used to make mine, but I can’t find it on your site anymore, and I’d like to make another few (being pregnant, I thought that 2 was enough, silly me). Do you have a way to send the link for the original one? It was all one fabric and had the elastic on the outside (not threaded through a pocket). Thanks!
this is the first changing pad cover we posted, maybe it was the first crib sheet tutorial that you used? that one had elastic sewn on instead of in a pocket: DIY Cute Crib Sheet.
Will this pattern work for a 3-sided changing pad also?
Hi. I dont have pinking shears, do i just need to fold my corner fabric and press under before sewing corners? I’m new to sewing, I’m assuming the shears keep fabric from unraveling?? Thanks!
yes you can or you can sew the edges with a zig zag or coverstitch to finish
[…] The prints are from this adorable Etsy shop. I made the changing pad cover using a great tutorial from Prudent Baby. […]
[…] Read more Share this:EmailPrintFacebook Filed Under: Soft Furnishings Tagged With: baby, nursery […]
This is a fantastic tutorial! I’ve used it to make 4 changing pad covers for my sister-in-law’s nursery recently and they turned out great. Thank you!
[…] fun fabric (with spray tac) to the glass. I also made a custom diaper changing pad (tutorial found here). I made the curtain rod with the lace flower‘s as well (here’s the how to make a […]
Hi there, I absolutely love this and am going to be making this sometime this week! My change pad is 32 by 16.5 by 4.5. Will I use the same dimensions you listed or alter them? Would I have to alter the cut out corners too? Thank you so much! Stephanie
Thank you, Thank you, Thank you! I’ve been looking for a black minky fabric changing pad cover & the only ones I can find are terribly expensive. Thanks to you, I was able to make 2 changing pad covers exactly the color I wanted for less than $20.00. Your tutorial is amazingly easy to follow as I’m not an experienced sewer. I can’t say Thank You enough!
Great tutorial! I made two of these today for my baby’s nursery. THANKS!
[…] sheets looked, I thought I would see what I could find to make my own changing pad cover. This tutorial from Prudent Baby is the perfect starting place! Changing Pad Cover Tutorial from Prudent […]
[…] Lastly, for the changing pad cover, I followed this contoured cover tutorial here. If you have a non-contoured changing pad cover, this is a good tutorial. […]
I am coinfused by the step where you meet the squares and sew all four corners? what is the end point? Do you see i close and turn right outside out? Is it the big sqaure in the middle or the end circles? Sorry but I am confused!
[…] prudentbaby.com via Melissa on […]
Hi! I’m using this tutorial to make a changing pad cover but I was wondering if I should just order a yard for the accent fabric? Im new to sewing so I have no idea how much fabric I should order!
Thanks in advance!
I am coinfused by the step where you meet the squares and sew all four corners? the longer sides or the shorter sides?
[…] She helped me with all of the fabric items. She covered the ottoman and changing pad. We used this tutorial for the changing pad cover. My Aunt Beth made the wall hanging with the barn; it is a great start […]
[…] of the weekend was productivity, not tutorials. We basically followed this one though from Prudent Baby without much issue at […]
Lovely and simple!
I wonder; could I get away with 46in instead of 48 (then just cut in 7×7)? I have an oversized pillow case that after it’s all unseemed only gives me 46. I could do the 2 tone, but I was just hoping to use what I had around the house. I looked at my pad, I really think it would still wrap all the way under after the elastic (it wraps under now). What do you think?
not 100% sure but seems worth a try?
I just whipped one of these up in a solid green minky fabric. Thank you so much for the post. I am a novice seamstress and this was super simple to follow. 🙂
[…] PAD COVER: DIY (using this tutorial), fabric from Hobby […]
[…] the tutorial that I used from Prudent Baby. It was pretty easy to follow, so I recommend it. Now that I’ve done one, I could easily […]
Thank you! This was an awesome tutorial and made the project very easy! I’m a first time seamstress and had no problems!! Thanks again!!
[…] made a changing pad cover with some fabric I had left over from my quilt and using this tutorial from one of my favorite craft blogs, Prudent Baby. It is a pretty simple tutorial and just took me […]
Wow, I just cranked out two of these in about an hour(and that included chatting on the phone with my sister!). These are SUPER easy to make on my serger! Thanks for the great tutorial!
great to hear! enjoy!
This looks fantastic! I wanted to use this fabric – http://www.ikea.com/gb/en/catalog/products/50177906/ and was wondering if the fact that is has plastic coating will have any implications on the sewing or on the elasticity at the edges? Thanks!
I made a couple of these according to the tutorial, but recently tried a little variation to get the whole cover out of a super-cute fabric, using less than a yard: I used the full width of fabric as my long dimension, then figured out how big to cut the squares for the corners.
My fabric was 43″ wide, so I cut it to 43″x27″, then cut 5 1/2″ squares for the corners. Using as small a seam allowance as I could, I sewed the corners with French seams. I sewed fold over elastic on the edge, all the way around, stretching as I sewed.
So easy, and it used just 3/4 yard of fabric!!
Thank you so much for a great tutorial. If you have a minute, and know the answer ;), could you help me out please?! I have a different size piece of foam for a changing pad and I’d like to make a cover. I’m having a hard time deciphering how you made dimensions of fabric from the dimensions of your pad. Do you have a formula to offer? (I think you may have taken the L of the pad (32″) and halved it (16″) then added that to the L = 48″. Then did you double the W? My pad is quite a bit thicker than the standard. I can figure out how to do the different prints well enough, just the method to the madness would help get me going. Thanks again.
wonderful points altogether, you just won a new reader.
What would you suggest in regards to your publish that you simply made some days in the past?
Any sure?
When sewing the corners of the change pad cover what size seam allownace should I be using?
Your tutorial is so easy to follow, kudos to you.
Thanks for the tutorial. It was super easy to make and came out great.
So easy! My changing pad just ripped right down the middle. I’ve been looking at covers and new pads… they are too expensive. I found this tutorial on Pinterest amd decided to try it. I used a bath towel and it worked out great!
[…] Found at Prudent Baby […]
Hi will this tutorial work the same for a contour change mat? Or one that isnt?
Any time considering standard or maybe “Vanilla” alternatives, these terms apply to
how a possibility surface finishes at the end from the solution
time period. Simply by noticing good news lets out on the morning, financial accounts,
or even the modern on highly trending marketplaces,
you should utilize this data to anticipate which means a market
may unavoidably head out. While thinking about tough items, these include really
lasting possessions that companies can purchase
locations this would include things like autos, electronic digital
equipment, and in some cases professional airplanes. Each new bank account
with binary options broker reviews gets an additional all the way to 50% on the 1st deposit.
Thank you this is quick and easy and I made 5 of them in a few hours.
I just finished making this. Easy tutorial and turned out great! However my edges caved in when I used 36″ elastic so I added to it or a total of 46″ and it fit’s wonderfully. Thank you so much for posting this!
[…] Feet sewed a changing pad cover. How adorable are those […]
I am a seamstress by no means, and it made this today. Completing a project from start to finish in one afternoon is quite an accomplishment for me! Thanks for the tutorial, it was so easy to follow. I will probably make a few more!
[…] figure out something else I could sew, and then looked on pinterest as well. I found this tutorial here. A diaper changing pad cover! Now, we were given our changing pad for free from my mama from my […]
[…] The orange rhino clock is from LeLuni on Etsy, the orange owl planter is from White Dove Crafts on Etsy , and orange ‘read’ sign are all from Etsy. I made […]
[…] Helpful Resources DIY Changing Pad Cover Tutorial | Pretty Prudent – Prudent Baby […]
[…] Pad Cover – DIY using this tutorial – Fabric from […]
[…] The orange rhino clock is from LeLuni on Etsy, the orange owl planter is from White Dove Crafts on Etsy , and orange ‘read’ sign are all from Etsy. I made […]
[…] The Michelle Armas art above the dresser inspired the color scheme. I’ve been sewing up a storm over the past few days, and that pink changing pad cover was one of my recent successes (easy tutorial here). […]
[…] after work, I got out my sewing machine and made a changing pad cover. It was pretty easy! I used this tutorial from Pretty […]
Hi, I’ve been asked to sew a “pillow cover style” cover for a baby changing mat, probably because they know I’m not an experienced sewer. But when I look at your tutorial, this is really the style cover I think they will be happy with, and it looks like something I will be able to sew.
But I have a couple of “newbie” questions that I’m hoping you will be kind (and patient!) enough to answer:
(1) When you say cut a 32″ x 48″ piece of fabric, do you really mean it, or do you mean cut a 32 1/2″ x 48 1/2″ piece of fabric (your measurements plus the 1/4″ seam allowances)?
(2) What size should the piece be if the mat I’m covering measures 33″ x 17 1/2″ x 1″?
I thought I’d experiment with elastic size, starting with the longest length least I think I might need, say 60″??
Thanks in advance!
Oops, and (3) What size square should I cut out of the corner? Thanks!
[…] light pink and the other was a coral color – both fabrics were Kona solids from JoAnn. I used this tutorial which calls for one piece of 48″x32″ fabric and a yard of elastic, and the process […]
[…] their changing pad cover patterns for free, we now have three brand new covers, yeah!! Here is the pattern I used. I followed her instruction, but the elastic was a bit snug, so I adjusted my elastic length […]
[…] saw this changing pad cover tutorial for a two fabric changing pad cover on Prudent Baby, which is a pretty popular baby blog. I […]
[…] while ago, I found a DIY Changing Pad Cover Tutorial over at Carissa Miss, and she found it from Prudent Baby. I had planned on getting rid of our changing table, but it somehow survived the move to Tucson and […]
Hi how much fabric of each would be needed? A full yard or will half a yard of each work?
Thanks for the great tutorial! Mine came together in about 20 minutes. So simple. I didn’t have elastic on hand so I skipped the tubing part, and just corner sewed the four corners on the bottom. A little tricky to get the cover on (I had to bend the changing pad into a curve), but once in place it fit perfectly. Love this so much for baby girl’s nursery
Some links may be affiliate links. Through Amazon Associates and other partnerships, we receive money if you buy something or take an action after clicking one of the links on our site.